The analog board in the bottom of the Color Classic chassis, below the CRT, with the rear housing removed. Apple Computer, Service Source.
The analog board of the Macintosh Color Classic carries the power supply and the display circuits; Apple lists it as "Analog Board/Power Supply", part 661-0732.[1] The Macintosh Color Classic II uses the same board and the same removal procedure, and the Macintosh Performa 250 and Macintosh Performa 275 are the Color Classic and Color Classic II under other names.[2] The board slides out of the bottom of the chassis once the rear housing is off, the CRT is discharged, the video board is off the CRT neck and four cables are unplugged.[3] It has to come out to fit a replacement, to recap it, or to repair the burnt resistors and zener diodes found on many of these boards (see Macintosh Color Classic Analog Board Zener and Resistor Replacement).[4]
Apple's symptom charts send these faults to a replacement analog board, after the simpler cures listed with them:[5]
No picture, no sound and no drive activity, once the power cord and the rear switch have been checked and another cord tried. Apple's next cure after the analog board is the logic board.
Clicking, chirping or thumping, after checking the logic board power connection.
Smoke or a burning smell.
A single horizontal or vertical line, a picture that breaks into diagonal lines or rolls, a flashing or wavy picture, or a high-pitched noise.
Poor linearity, and any size, centring, focus, colour or distortion fault that the adjustments do not cure.
A thin grey horizontal line across the bottom third of the screen is part of the Trinitron design and is not a fault.[5] Work through Macintosh Color Classic Troubleshooting before condemning the board.
Warning: the analog board works at mains voltage and drives the CRT, which holds a high-voltage charge after the machine is unplugged. Apple's preliminary steps are to remove the rear housing, discharge the CRT and remove the anode cap, and it warns never to use a grounding wrist strap until the CRT has been discharged.[3] See CRT Discharge Procedure.
The board is powered whenever the machine is plugged in with the rear switch on, even when it has been shut down from the keyboard: JDW measured 8.3 to 9 W drawn from the wall in that state.[6] Unplug the power cord before you start.
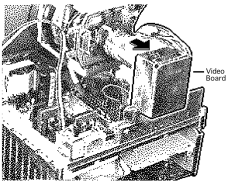
The video board ground wire. Apple Computer, Service Source.
Unhook the video board ground wire from the CRT grounding strap.[3]
Pulling the video board off the CRT neck. Apple Computer, Service Source. If sealant holds the video board, cut it with an art knife. Pull the video board carefully straight off the neck of the CRT.[3]
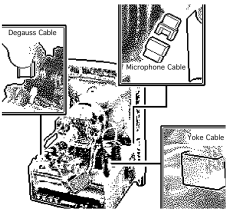
The degauss cable at BP2, the microphone cable and the yoke cable at BD1. Apple Computer, Service Source. Release the connector latch with a flat-blade screwdriver and disconnect the degauss cable from analog board connector BP2.[3]
Disconnect the two halves of the microphone cable.[3]
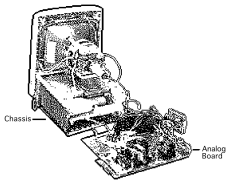
Sliding the analog board out of the chassis. Apple Computer, Service Source. Pull the analog board out about two inches (50 mm) and line up its edge with the cutouts in the plastic guide. The speaker cable is still connected underneath, so do not pull it further.[3]
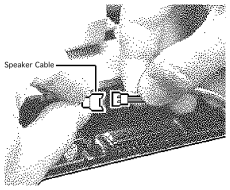
The speaker cable connector beneath the analog board. Apple Computer, Service Source. Disconnect the two halves of the speaker cable beneath the board.[3]
Reconnect the speaker cable, slide the board back along the plastic guide, and reconnect the microphone cable, the yoke cable at BD1 and the degauss cable at BP2.[3]
Push the video board back on to the neck of the CRT and refit the anode cap.[3]
Hook the video board ground wire securely back on to the CRT grounding strap. Apple warns that switching on without it connected can damage components.[3]
Switch on and check for the start-up chime and a picture.[5]
Apple requires the cutoff video adjustment whenever the analog board is replaced, followed by the white balance adjustment. See Macintosh Color Classic Video Adjustment.[8]
If the adjustments are made with the rear housing off, check first that the metal chassis is not touching the bottom of the logic board, and support the rear corners of the chassis.[9]
The board in the Color Classic II and Performa 275 has the same Apple part number and the same take-apart steps as the Color Classic's.[2]
Boards photographed in the TinkerDifferent thread carry the assembly number 630-0349, and one owner's board is printed PCBF, ANALOG, MAC COLOR CLASSIC, 820-0360-C.[4]
↑ 3.003.013.023.033.043.053.063.073.083.093.103.113.123.133.143.153.163.173.183.19Apple Computer, Macintosh Color Classic Service Source, Take Apart, Analog Board pp. 8-13 (PDF pp. 45-50): preliminary steps, warnings, ground wire, video board, connectors BP2 and BD1, microphone and speaker cables, removal through the plastic guide.
↑ 4.04.14.2TinkerDifferent, "Color Classic analog board trouble", thread started by YMK, 14 February 2023, with later posts by JDW and others to August 2025. Burnt DL21, DL22 and RL62 on several boards; the standby power drawn with the rear switch on (page 3).
↑ 5.05.15.2Apple Computer, Macintosh Color Classic Service Source, Troubleshooting, Symptom Charts pp. 2-8 and 17 (PDF pp. 20-26 and 35).
↑TinkerDifferent, "Color Classic analog board trouble", page 3, JDW, 4 and 5 May 2023: 8.5 to 9 W drawn with the rear switch on and the machine shut down, settling to 8.3 W after 24 hours.
↑ 7.07.17.27.37.47.5Apple Computer, Macintosh Color Classic Service Source, Take Apart, Rear Housing pp. 5-7 (PDF pp. 42-44).
↑Apple Computer, Macintosh Color Classic Service Source, Adjustments, Video p. 10 (PDF p. 108): "Perform the cutoff video adjustment whenever you replace the analog board."
↑Apple Computer, Macintosh Color Classic Service Source, Adjustments, Geometry p. 2 (PDF p. 100).