The Color Classic with its rear housing off: the two groups of adjustment controls on the analog board, the high-voltage areas and the chassis support. Apple Computer, Service Source.
Apple's display adjustments for the Macintosh Color Classic set the picture's centring, size and focus, the CRT cutoff and white balance, the convergence, the geometric distortion and the tilt of the yoke. The same procedures and targets are printed in the Service Source for the Macintosh Color Classic II, and the two machines use the same analog board, Apple part 661-0732.[1][2][3] The Macintosh Performa 250 is the Color Classic and the Macintosh Performa 275 is the Color Classic II, and the procedures apply under all four names. Apple says the cutoff adjustment must be done whenever the analog board is replaced, and that the yoke will probably need adjusting after a CRT is replaced.[4][5]
The adjustments are made from the back of the machine with the rear housing off and the power on. Apple's procedures use the test patterns of its Display Service Utility, which the Color Classic II manual locates in the Utilities folder of the MacTest Pro CD.[1][6]
These entries in Apple's video symptom chart send the technician to an adjustment before any part is replaced:[7]
Symptoms Apple cures first with an adjustment
Symptom
Adjustment
Screen black, too dark or too bright, with sound and drives working
Contrast button, PRAM reset and yoke cable first; then video adjustments
Screen bright but no picture
Video adjustments
Colour tint, or a colour that cannot be adjusted
Video adjustments
Colour bleeds from text or lines
Convergence
Out of focus
Focus
Raster too tall, short, wide or narrow
Size controls
Raster tilted
Geometry, then yoke
Raster distorted (barrel, corners, sides)
Geometric distortion
Raster not centred
Centring controls
For a tilted, distorted or off-centre raster, Apple's first step is to move the machine somewhere else, to rule out magnetic fields from its surroundings.[7] If the adjustment does not cure the symptom, the next cure in Apple's charts is a replacement analog board; see Macintosh Color Classic Troubleshooting.[7]
A thin grey horizontal line across the bottom third of a lit screen is part of the Trinitron design. Apple says not to replace anything for it.[7]
Warning: the analog board, the flyback and the yoke carry high voltage while you work, and the CRT holds a charge after the machine is unplugged. Apple's warnings for these procedures:[1][8][5]
Do not use metal alignment tools; they are a shock hazard. Use a short, rigid, hex-head plastic tool.
The whole yoke assembly has very high voltage. Do not touch the yoke, the anode wire or the yoke wires.
Make yoke adjustments from the rear and watch the screen in a mirror. Do not reach round the computer.
With the rear housing off, the metal chassis can short to the bottom of the logic board. Check that the chassis is clear of the board before switching on, and support the rear corners of the chassis so that it cannot buckle.
See CRT Discharge Procedure before tightening the yoke clamp or touching anything near the tube.
A light meter or photometer for the sub-contrast setting. Apple gives readings for three meters: the R77 (Apple part 076-0310), the L-248 and the 246.[11]
The horizontal centre (HS) and vertical centre (VS) controls on the analog board, with the vertical angle control (PR) beside them. Apple Computer, Service Source.
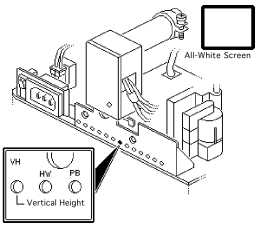
Switch on and display the All-White Screen pattern.[1]
Turn the vertical centre control (VS) until the raster is centred from top to bottom.[1]
Turn the horizontal centre control (HS) until the raster is centred from side to side.[1]
The vertical height (VH), horizontal width (HW) and horizontal bow (PB) controls on the analog board. Apple Computer, Service Source. Turn the vertical height control (VH) until the raster is 4.9 in (± 1/16 in), or 124.5 mm (± 1.5 mm), high. Measure it again; if it is off, repeat the height adjustment and, if necessary, the vertical centring.[1]
Turn the horizontal width control (HW) until the raster is 6.7 in (± 1/16 in), or 168.5 mm (± 1.5 mm), wide.[1]
Do the cutoff adjustment before white balance, and after any analog board replacement.[4]
Leave the machine switched on for at least 10 minutes first.[4]
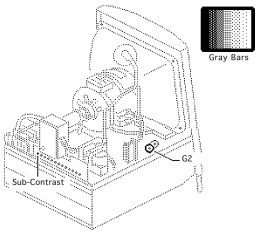
Display the Gray Bars pattern and press the contrast-up button on the bezel until contrast is at maximum.[4]
Open the Brightness control panel from the Apple menu and drag the brightness control to midrange.[4]
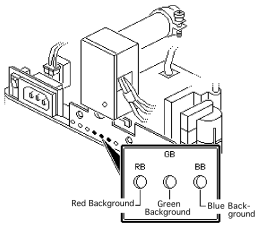
The red (RB), green (GB) and blue (BB) background controls. Apple Computer, Service Source. Turn the red, green and blue background controls (RB, GB, BB) fully counterclockwise.[4]
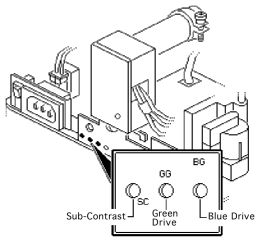
The sub-contrast (SC), green drive (GG) and blue drive (BG) controls. Apple Computer, Service Source. Set the green and blue drive controls (GG, BG) to their three-quarter position: turn each fully clockwise, then back a quarter turn counterclockwise.[4]
Turn the sub-contrast control (SC) fully clockwise.[4]
The G2 control and the sub-contrast control. Apple Computer, Service Source. Adjust G2 until the first bar of the pattern is completely black and the second is barely visible.[4]
Set the sub-contrast control to its centre position.[4]
Keep the Gray Bars pattern on screen, contrast at maximum and brightness at midrange.[4]
Note the predominant colour, then adjust the red, green and blue background controls in turn until there is no predominant colour in the four darkest bars.[4]
If necessary, adjust the blue and green drive controls until there is no predominant colour in the four brightest bars. The darkest bar must stay completely black throughout; if it takes on a colour, correct it with that colour's background control.[4]
Check the four darkest bars again and correct them with the background controls if needed.[4]
Display the All-White Screen pattern and adjust the sub-contrast control until the screen measures 37 foot-lamberts (± 3). Apple gives the equivalent readings for its three meters in the table below.[4]
Sub-contrast target, 37 ft-L (± 3), on Apple's meters[4][11]
Meter
Reading
Setting up the meter
R77 (076-0310)
27 on the bottom scale
Remove the 10X multiplier plate, set the scale switch to its bottom (10-50 fc) position, and hold the lens against the middle of the screen
L-248
High end of 10 on the 10-18 scale
Press the red button to check the battery, move the side switch up to the 10-18 scale, uncover the lens and press the read button with the lens on the middle of the screen
246
27 on the red scale
Remove any metal slide, fit the white lens with the red dot and turn the swivel head so the lens faces the screen
Apple notes that light meters drift with age and with shocks. Check a doubtful meter against a known-good meter or photometer; the R77 carries a four-digit date stamp, such as 0398 for March 1998.[11]
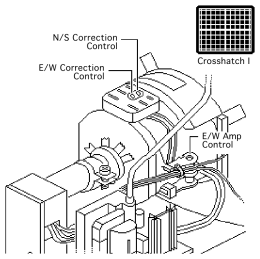
Adjust the convergence control on the CRT video board for the best overall convergence.[10]
The N/S correction, E/W correction and E/W amp controls at the yoke. Apple Computer, Service Source. Adjust the N/S correction control for the best convergence of the horizontal lines at the top and bottom of the screen.[10]
Adjust the E/W correction control for the best convergence of the vertical lines at the left and right sides.[10]
Adjust the E/W amp control for the best convergence of the horizontal lines at the left and right sides.[10]
The distortion controls: horizontal bow (PB), pin phase (KS) and vertical angle (PR). Apple Computer, Service Source.
These controls correct distortions other than centring, size and focus.[8]
Compare the display with the distortions in Apple's figure and adjust the matching control: horizontal bow (PB) for bowed sides, pin phase (KS) for a trapezoid, vertical angle (PR) for a parallelogram.[8]
If the picture is too distorted to tell which control is needed, adjust them in this order: pin phase (KS), vertical angle (PR), horizontal bow (PB).[8]
If it is still distorted, repeat the vertical angle and pin phase adjustments.[8]
The plastic yoke collar and the yoke clamp screw. Apple Computer, Service Source.
With the machine switched off, loosen the yoke clamp screw two or three turns with the insulated cross-tip screwdriver.[5]
Check that the chassis is clear of the logic board, then switch on.[5]
Watching the screen in the mirror, hold the plastic yoke collar and rotate it until the top and bottom edges of the picture are parallel with the top and bottom of the bezel.[5]
Switch off, unplug the computer and discharge the CRT.[5]
Hold the collar in position and tighten the yoke clamp screw so that the collar cannot slip. Do not overtighten it.[5]
Switch on with the rear housing fitted and check that the top and bottom edges of the picture are parallel with the bezel.[5]
Check the All-White Screen raster against the 4.9 in by 6.7 in targets, the Focus pattern for sharpness, and the Crosshatch I pattern for convergence.[1][10]
On the Gray Bars pattern the darkest bar should be black and no bar should show a predominant colour.[4]
↑Apple Computer, Macintosh Color Classic Service Source, Exploded View (PDF p. 141): Analog Board/Power Supply 661-0732. The Color Classic II/Performa 275 exploded view prints the same number.