The LC 520 with the rear cover off: the row of adjustment controls on the analog board and the high-voltage areas. Apple Computer, Service Source.
Apple's display adjustments for the Macintosh LC 520 set the centring, size and focus of the Trinitron picture, the CRT cutoff and white balance, the convergence, the geometric distortion and the tilt of the yoke.[1] The Macintosh LC 550 and Macintosh LC 575 share the analog board, Apple part 661-0192, and the same procedures.[2] The Performa versions, the Macintosh Performa 550, Macintosh Performa 560, Macintosh Performa 575, Macintosh Performa 577 and Macintosh Performa 578, have their own Service Source, which prints the same targets.[3] Apple requires the cutoff adjustment whenever the CRT or the analog board is replaced, and expects the yoke to need adjusting after a CRT replacement.[4][5]
If the adjustment does not cure the symptom, the next cure in Apple's chart is a new analog board; see Macintosh LC 520 Analog Board Replacement.[6] A thin grey horizontal line across the bottom third of a lit screen is part of the Trinitron design, and Apple says not to replace anything for it.[6]
Warning: the analog board, the flyback and the yoke carry high voltage while you work, and the CRT holds a charge after the machine is unplugged. Apple's warnings for these procedures:[1][7][5][8]
Do not use metal alignment tools; they are a shock hazard. Use a short hex-head plastic tool.
The whole yoke assembly has very high voltage. Do not touch the yoke, the anode wire or the yoke wires.
Make yoke adjustments from the rear and watch the screen in a mirror. Do not reach round the computer.
Never use a grounding wrist strap until the CRT has been discharged.
A light meter or photometer for the sub-contrast setting. Apple gives readings for three meters: the R77 (Apple part 076-0310), the L-248 and the 246.[10]
The centre ground pin on the rear cover shield. Apple Computer, Service Source.
If the rear cover shield has bronze tape on it, remove the tape; Apple says not to refit it. Bend the centre ground pin on the rear cover shield back about 1/8 inch (3 mm).[8]
Lifting off the rear cover after removing its screws. Apple Computer, Service Source. Remove the five screws with the Torx screwdriver and lift off the rear cover.[8]
The horizontal centre (HS) and vertical centre (VS) controls, with PR beside them. Apple Computer, Service Source.
Switch on and display the All-White Screen pattern.[1]
Turn the vertical centre control (VS) until the raster is centred from top to bottom.[1]
Turn the horizontal centre control (HS) until the raster is centred from side to side.[1]
The vertical height (VH) and horizontal width (HW) controls, with PB beside them. Apple Computer, Service Source. Turn the vertical height control (VH) until the raster is 7 in (± 1/8 in), or 176 mm (± 2 mm), high. Measure it again; if it is off, repeat the height adjustment and, if necessary, the vertical centring.[1]
Turn the horizontal width control (HW) until the raster is 9 1/4 in (± 1/8 in), or 235 mm (± 2 mm), wide. Apple notes that differences in video timing across its range can make the width vary by up to 3/16 inch at each side; the adjustment sets it to its proper width.[1]
Do the cutoff adjustment before white balance, and do both after the monitor has been on for at least 10 minutes.[4]
Display the Gray Bars pattern and press the contrast-up button until contrast is at maximum.[4]
Open the Screen control panel in the Control Panels folder and drag the brightness control to midrange.[4]
The red (RB), green (GB) and blue (BB) background controls. Apple Computer, Service Source. Turn the red (RB), green (GB) and blue (BB) background controls fully counterclockwise.[4]
The green drive (GG), blue drive (BG) and sub-contrast (SC) controls. Apple Computer, Service Source. Set the green (GG) and blue (BG) drive controls to their three-quarter position: turn each fully clockwise, then back a quarter turn counterclockwise.[4]
Turn the sub-contrast control (SC) fully clockwise.[4]
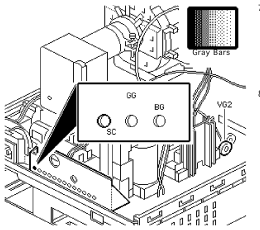
The VG2 control on the flyback, and the SC, GG and BG controls. Apple Computer, Service Source. Adjust VG2 until the first bar of the pattern is completely black and the second is barely visible.[4]
Set the sub-contrast control (SC) to its centre position.[4]
Keep the Gray Bars pattern on screen, contrast at maximum and brightness at midrange.[4]
Note the predominant colour, then adjust the red, green and blue background controls in turn until there is no predominant colour in the four darkest bars.[4]
If necessary, adjust the blue (BG) and green (GG) drive controls until there is no predominant colour in the four brightest bars. The darkest bar must stay completely black throughout; if it takes on a colour, correct it with that colour's background control.[4]
Check the four darkest bars again and correct them with the background controls if needed.[4]
Display the All-White Screen pattern and adjust the sub-contrast control (SC) until the screen measures 33 foot-lamberts (± 3). Apple gives the equivalent readings for its three meters in the table below.[4]
Sub-contrast target, 33 ft-L (± 3), on Apple's meters[4][10]
Meter
Reading
Setting up the meter
R77 (076-0310)
25 on the bottom scale
Remove the 10X multiplier plate, set the scale switch to its bottom (10-50 fc) position, and hold the lens against the middle of the screen
L-248
Middle of 10
Press the red button to check the battery, move the side switch up so the scale reads 10 to 18, uncover the lens and press the read button with the lens on the middle of the screen
246
25 on the red scale
Remove any metal slide, fit the white lens with the red dot, turn the swivel head so the lens faces the screen, and hold it against the middle of the screen
Apple notes that light meter tolerance drifts over time. Check a doubtful meter against a known-good meter or photometer; the R77 carries a four-digit date stamp, such as 0398 for March 1998, and a dropped meter may read wrongly or fail to return to zero.[4][10]
Adjust the convergence control on the CRT video board for the best overall convergence.[9]
The N/S amp, upper correction and lower correction controls at the yoke. Apple Computer, Service Source. Adjust the N/S amp control for the best convergence of the horizontal lines at the top and bottom of the screen.[9]
Adjust the lower correction control for the best convergence of the vertical lines at the bottom of the screen.[9]
Adjust the upper correction control for the best convergence of the vertical lines at the top of the screen.[9]
The distortions corrected by horizontal bow, pin phase and vertical angle. Apple Computer, Service Source.
Display the Crosshatch I pattern and check that the boxes in the top row are the same size as those in the bottom row, and those on the left the same size as those on the right.[7]
Compare the display with Apple's figure: horizontal bow (PB) corrects bowed sides, pin phase (KS) a trapezoid, and vertical angle (PR) a parallelogram.[7]
The PB, KS and PR controls, with HS and VS between them. Apple Computer, Service Source. Adjust the matching control with the plastic tool.[7]
If the picture is too distorted to tell which control is needed, adjust them in this order: pin phase (KS), vertical angle (PR), horizontal bow (PB). If it is still distorted, repeat the vertical angle and pin phase adjustments.[7]
The plastic yoke collar. Apple Computer, Service Source. Watching the screen in the mirror, hold the plastic yoke collar and rotate it until the top and bottom edges of the picture are parallel with the top and bottom of the bezel.[5]
Switch off, unplug the computer and discharge the CRT.[5]
Hold the collar in position and tighten the yoke clamp screw so that the collar cannot slip. Do not overtighten it.[5]
Switch on and check that the top and bottom edges of the picture are parallel with the bezel.[5]
Check the All-White Screen raster against the 7 in by 9 1/4 in targets, the Focus pattern for sharpness, and the Crosshatch I pattern for convergence and even box sizes.[1][9][7]
On the Gray Bars pattern the darkest bar should be black and no bar should show a predominant colour.[4]
The Macintosh TV Service Source prints the same procedure, controls and targets: 7 in by 9 1/4 in, and 33 foot-lamberts on the All-White Screen. On the TV, set brightness to midrange from the Brightness control panel.[11] See Macintosh TV Analog Board Replacement.
↑Apple Computer, Macintosh LC 520/550/575 Service Source, Exploded View (PDF p. 176): Analog Board 661-0192, CRT 661-1666.
↑Apple Computer, Performa 500 Series Service Source (Performa 550, 560, 575, 577 and 578), Adjustments: raster height 7 in (Geometry, PDF p. 126), width 9 1/4 in (PDF p. 128) and sub-contrast 33 foot-lamberts with the same three meter readings (Video, PDF p. 140). Hosted as File:Performa 500 series.pdf; see Performa 500 Series Service Source.