The LC 580 with the rear housing off: the row of adjustment controls on the analog board and the high-voltage areas. Apple Computer, Service Source.
Apple's display adjustments for the Macintosh LC 580 set the centring, size and focus of the picture on the 14-inch shadow-mask CRT, the CRT cutoff and white balance, the convergence and the geometric distortion. They are made from the back of the machine with the rear housing off, using the test patterns in Apple's Display Service Utility.[1][2] The same manual covers the Macintosh Performa 580CD.[1] The Macintosh Performa 588CD, sold outside the United States, has the same specification on Apple Japan's data sheet, including the 14-inch shadow-mask screen, and is serviced as an LC 580.[3] Apple requires the cutoff adjustment whenever the CRT or the analog board is replaced.[4]
Apple's video symptom chart sends these faults to an adjustment before any part is replaced:[5]
Symptoms Apple cures first with an adjustment
Symptom
Cures in Apple's chart before a new part
Screen black, too dark or too bright, with sound and drives working
Contrast and brightness buttons on the front bezel; yoke cable connection; video adjustments
Screen bright, sound present, but no picture
Video adjustments
Colour tint, or a colour that cannot be adjusted
Video adjustments (no part listed)
Picture breaks into diagonal lines or rolls
Geometry adjustments
Colour bleeds from text or lines
Convergence; some misconvergence is normal, especially at the edges
Out of focus
Focus (misconvergence can also look like poor focus); then check the luminance and, if it is off, do cutoff and white balance
Raster too tall, short, wide or narrow
Geometry adjustments
Raster tilted, shifted or distorted
Move metal objects away; if it started after a CRT replacement, refit and align the CRT as the Take Apart chapter describes; geometric adjustments
If the adjustment does not cure the symptom, the next cure in Apple's chart is a new analog board; see Macintosh LC 580 Analog Board Replacement. Apple's First Checklist adds that the raster is not always a perfect rectangle, that nearby magnetised metal and other electronics or fluorescent lights can distort it or make it jitter, and that a misadjusted screen can look like a failed analog board or CRT.[5]
Warning: the analog board, the flyback transformer and the yoke carry high voltage while you work, and the CRT holds a charge after the machine is unplugged. Apple's warnings for these procedures:[2][4][6]
Do not use metal alignment tools; they are a shock hazard. Use a short hex-head plastic tool, which flexes less than a long one.
The adjustments are made from the rear, so put a mirror in front of the screen. Do not reach round the monitor.
The whole yoke assembly has very high voltage. Do not touch the yoke, the anode wire or the yoke wires.
With the rear housing off, the front bezel breaks easily if the machine is stood upright and handled. Handle it as little as possible.
Torx screwdriver and case cracker, to remove the rear housing.[7]
Short hex-head plastic adjustment tool for the analog board controls.[2]
Flat-head plastic adjustment tool or plastic screwdriver for the focus and screen controls on the flyback transformer and for the convergence controls.[2][4][8]
A mirror to watch the screen from behind the machine.[4]
Apple's Display Service Utility, for the All-White Screen, Focus, Gray Bars and Crosshatch I test patterns.[2][4]
A ruler, to measure the raster height and width that Apple specifies.[2]
A light meter or photometer for the luminance setting. Apple gives readings for its R77 (Apple part 076-0310), L-248 and 246 meters and for a photometer.[4][9]
The Service Source sets out the adjustments in this order: geometry and focus, then cutoff, white balance and luminance, then convergence and geometric distortion. Let the machine warm up first; Apple gives at least 10 minutes for cutoff and white balance and at least 15 minutes for convergence on the two-control CRT.[4][8]
Run the Display Service Utility and show the All-White Screen pattern.[2]
Turn VS (vertical shift) until the raster is centred from top to bottom.[2]
Turn HS (horizontal shift) until the raster is centred from side to side. VS and HS can also be reached with the rear housing on.[2]
Turn VH (vertical height) until the raster is 7 1/8 in ± 1/8 in (180 mm ± 2 mm) high. Measure it again; if it is off, repeat the height and, if needed, the vertical shift.[2]
Turn HW (horizontal width) until the raster is 9 1/2 in ± 1/8 in (240 mm ± 2 mm) wide.[2]
Press and hold the upper half of the brightness button until the brightness is at maximum.[4]
SC turned to maximum (clockwise) and RB, GB and BB to minimum (anticlockwise). Apple Computer, Service Source. Turn SC (sub-contrast) fully clockwise to maximum.[4]
Turn RB, GB and BB (red, green and blue bias) fully anticlockwise to minimum. The three leftmost bars darken or go completely black.[4]
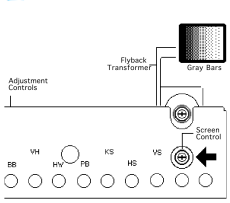
The screen control on the flyback transformer. Apple Computer, Service Source. With a plastic screwdriver, turn the screen control on the flyback transformer very slowly until the third darkest bar from the left is just faintly visible. Apple says this control should not need setting again unless it is moved by accident.[4]
Press and hold the lower half of the brightness button until the brightness is at minimum. The screen darkens or goes black.[4]
Adjust the bias controls. Any of them can be turned up as long as the leftmost (darkest) bar stays completely black. If the screen has a colour cast, start with the bias control that offsets it; otherwise start with GB.[4]
Adjust RB, GB and BB in turn until the leftmost bar is black and the eight darkest bars are neutral shades of grey. The darkest bar must stay black for the rest of the procedure; if it takes on a colour, correct it with the matching bias control.[4]
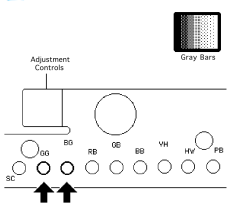
GG (green gain) and BG (blue gain). Apple Computer, Service Source. The eight brightest bars are usually neutral grey. If they are not, adjust BG (blue gain) and GG (green gain) until they are.[4]
Check the eight darkest bars again. If any colour shows, adjust the bias controls until the leftmost bar is black and the others are neutral grey.[4]
Luminance target on the All-White Screen pattern (Apple)
Meter
Reading
R77
24 on the bottom (10-50 fc) scale
L-248
10 on the 2-10 scale
246 (L-246)
24 footcandles on the red scale
Photometer
30 fL (foot-lamberts)
Show the All-White Screen pattern and hold the light meter or photometer against the centre of the screen.[4]
Press the upper half of the brightness button until the reading matches the target in the table for your meter.[4]
If the brightness button alone will not reach it, turn SC higher (clockwise).[4]
Show the Gray Bars pattern again and check the result.[4]
For the R77, remove the 10X multiplier plate from the lens, set the scale switch to its bottom position and read the bottom scale. Apple warns that a dropped meter may read wrongly, and suggests checking a doubtful meter against a known-good meter or photometer.[9]
With a flat-head plastic tool, adjust the convergence control for the best convergence of the horizontal lines at the top and at the bottom of the screen.[8]
With a flat-head plastic tool, adjust the control labelled YCH or VR1 for the best convergence of the horizontal lines at the top and bottom of the screen.[8]
Adjust the control labelled TLV or VR2 for the best convergence of the vertical lines at the left and right sides.[8]
Apple notes that some misconvergence is normal, especially at the edges of the screen.[5]
Keystone, trapezoid and horizontal bow distortion. Apple Computer, Service Source.
Show the Crosshatch I pattern. Keep clear of the yoke, the anode wire and the yoke wires.[6]
Compare the picture with Apple's drawings of keystone, trapezoid and horizontal bow distortion to choose the control.[6]
PB (horizontal bow), KS (keystone) and the unlabelled trapezoid control at the end of the row. Apple Computer, Service Source. With the hex-head plastic tool, adjust KS for keystone, the last unlabelled opening in the row for trapezoid, or PB for horizontal bow.[6]
If the picture is too distorted to tell which control is needed, adjust KS, then trapezoid, then PB, and repeat all three if it is still distorted.[6]
Apple notes that a correctly adjusted raster may not be a perfect rectangle, since CRT tolerances allow some bowing and edges that are not straight.[6]
Show each test pattern again and check the targets above: centred raster, 180 mm × 240 mm, sharp centre focus, the darkest bar black and the grey bars neutral, the luminance reading, and converged lines.[2][4][8]
Apple says two types of CRT can be fitted, with one or two convergence controls on the yoke.[8] Separately, the exploded view lists two CRT part numbers, 661-0945 for the northern hemisphere and 661-0947 for equatorial and polar regions.[10]
The LC 580's targets differ from the LC 520's. The raster here is 7 1/8 in by 9 1/2 in against 7 in by 9 1/4 in, and cutoff is set until the third darkest bar is faintly visible, where the LC 520's VG2 setting leaves the first bar black and the second barely visible. Use Macintosh LC 520 Video Adjustment only for the LC 520, LC 550, LC 575 and their Performa versions.[2][4][11]
↑ 1.01.1Apple Computer, Macintosh LC 580/Performa 580CD Service Source, General Information pp. 1-2 (PDF pp. 3-4); Specifications (PDF pp. 8-20): 14-inch shadow-mask CRT.
↑ 5.05.15.25.3Apple Computer, Macintosh LC 580/Performa 580CD Service Source, Troubleshooting: First Checklist pp. 2-3 and Symptom Charts, Video pp. 5-10 (PDF pp. 23-24 and 26-31).
↑ 6.06.16.26.36.46.56.6Apple Computer, Macintosh LC 580/Performa 580CD Service Source, Adjustments, Geometric Distortion pp. 32-36 (PDF pp. 145-149).
↑ 7.07.1Apple Computer, Macintosh LC 580/Performa 580CD Service Source, Take Apart, Rear Housing pp. 14-16 (PDF pp. 61-63).
↑ 9.09.1Apple Computer, Macintosh LC 580/Performa 580CD Service Source, Adjustments, Light Meter Setup pp. 1-6 (PDF pp. 114-119).
↑Apple Computer, Macintosh LC 580/Performa 580CD Service Source, Exploded View (PDF p. 151).
↑Apple Computer, Macintosh LC 520/550/575 Service Source, Adjustments, Geometry and Video (PDF pp. 134-154): raster height 7 in, width 9 1/4 in; VG2 set until the first bar is black and the second barely visible. Hosted as File:Lc 520.550.575.pdf.